• Freezing Reverbs and Delays

    One advantage of digital delay-based effects is the ability to repeatedly rewrite a delay line without any losses. While this makes for a clean digital delay sound which is unwanted in some cases it add the ability to “freeze” delays or delay-based effects such as reverbs creating infinite sustain. In this blog post i shed some light on this surprisingly simple mechanism.

    Theory

    Basically every delay-based audio effect is potentially “freezable”. On prerequisite is that the shortest delay involved should be 1/20 of second (20Hz, the lowest audible frequency) duration or more to retain the original pitch of the frozen signal. If we keep repeating a shorter bit of audio the pitch is dominated by the length of the delay line instead of the content of the delay line. This would be granular synthesis, which is interesting in it’s own right but not what we’re looking for right now. Also the feedback should be adjustable in the effect itself to somehow determine the duration of the effect.

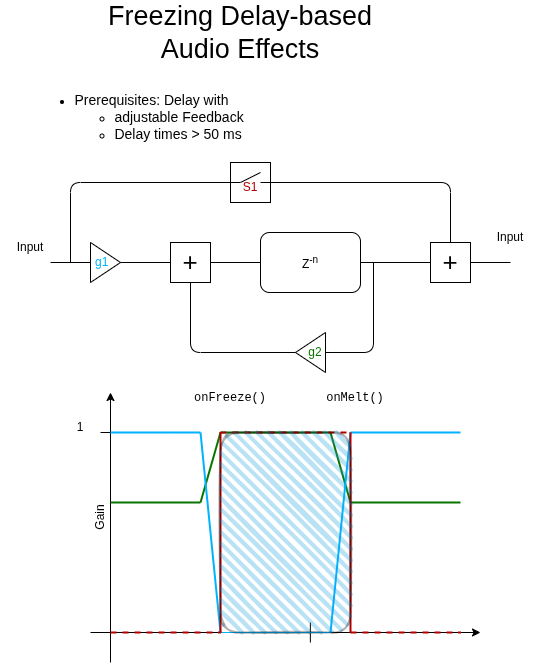
    The simplest topology for a freezable effect is a simple delay line (z^-n) return the past n-th sample in the familiar z-plane (infinite but discrete sampled time-domain). Some portion of the delayed signal is amplified (g2) and fed back to get repeating delays. A virtual switch (s1) and another gain stage (g1) have to be added to allow for a gradual change between a “frozen” and and “melted” stage which avoids unwanted clicks and artifacts.
    When the freeze process is initiated the input gain into the delay line is reduced to zero and the feedback gain is increased to 1. Once the feedback is at 1 the switch s1 is engaged allowing the input signal to bypass the delay line creating the ability to play over the frozen bit.
    When melting, the process is reversed.
    Some findings

    • Freezing sounds best when multipled delays with different delay length are involved
    • Generally any processor inside the feeback loop should be bypassed as well to create a static freeze effect. However leaving a mild low- or highpass might create insteresting evolving textures.
    • Changing the delay while frozen generates some nice manipulating capabilities delving into glitch or bitcrunch territory

    Software

    Check the following files for the overall structure and a specific implementation case (delay)

    https://github.com/StoneRose35/cortexguitarfx/blob/daisySeed/Inc/pipicofx/FxProgram.hpp

    https://github.com/StoneRose35/cortexguitarfx/blob/daisySeed/Inc/pipicofx/005_Delay.hpp

    https://github.com/StoneRose35/cortexguitarfx/blob/daisySeed/Src/pipicofx/FxProgram.cpp

    https://github.com/StoneRose35/cortexguitarfx/blob/daisySeed/Src/pipicofx/005_Delay.cpp

    https://github.com/StoneRose35/cortexguitarfx/blob/daisySeed/Src/common/audio/delay.c

    Video

  • Loopings

    During the past few months I dove into audio loops, both from musicians and makers perspective. Mainly because of some unused SDRAM on the daisy seed board i decided to implement a looper functionality. This has proven to be rather simple from a programming perspective. When playing around with the looper it has proved to be a useful musical tool and fun to play with. One thing a added which is not commonly present at least on smaller loopers is a retrigger function. This I added to be able to manually sync to loop to an external one. It has proved to be really useful for a two-person ambient project i’m part of. The video demonstrates the looper function and briefly explains the theory of operation.

    Theory

    A looper is essentially a very long delay with a “freeze” function. The sample processing method of the looper is as follows

    float LooperProcessSample(float sampleIn, LooperDataType* data)
    {
        float sampleOut;
        if (data->looperState == LOOPER_STATE_STOPPED)
        {
            return sampleIn;
        }
        if (data->looperState != LOOPER_STATE_RECORDING)
        {
            sampleOut = sampleIn + *(data->memoryPointer + data->currentPosition)*data->playVolume;
        }
        else
        {
            sampleOut = sampleIn;
        }
        
        if (data->looperState == LOOPER_STATE_RECORDING)
        {
    
            *(data->memoryPointer + data->currentPosition) = sampleIn*data->recordingVolume; 
            
        }
        if (data->looperState == LOOPER_STATE_OVERDUBBING)
        {
            *(data->memoryPointer + data->currentPosition) += sampleIn*data->recordingVolume; 
        }
    
        if (++data->currentPosition >= data->indexEnd)
        {
            data->currentPosition = data->indexStart;
        }
        return sampleOut;
    }

    Depending on the state of the looper we either add a sample from the delay line (data->memorypointer) to the input sample or don’t. Also, if the looper either recording or overdubbing we write into the delay line.
    The whole handling of the looper revolves around a state machine with the following data structure.

    typedef struct {
        float * memoryPointer;
        float playVolume;
        float recordingVolume;
        uint32_t indexStart;
        uint32_t indexEnd;
        uint32_t currentPosition;
        uint8_t looperState;
        uint8_t looperFunction;
    } LooperDataType;

    Suprisingly the state changes are rather complex although the looper is rather simple to use. P1 to P3 denote the foot switches of the PiPicoFX from left to right.

  • Raspberry Pi Pico 2 is out!

    While I was absorbed/busy because of summer and festival season I was completely unaware of a big announcement from Raspberry Pi: that a new Raspberry Pi Microprocessor, the RP2350 came out along with the Raspberry Pi Pico 2 as a “standard” Development Board. Also, some parts on my Youtube Channel got unexpected attention.

    So, let’s discuss briefly in which way the RP2350 impacts the PiPicoFX project. Sure not all the new feature are of interest but some definitely are

    • Dual Arm Cortex M33 instead of two M0+’s: Audio processing can be float on the Raspberry Pi Pico version as well! Luckily I already ported the audio algorithms to float
    • Double the RAM, 520kb instead of 260kb: At first glance a doubling of the delay times! Only at the first glance since a float processing a sample is double the size so we end up having roughly the same number of samples in RAM.
    • 150 MHz max CPU frequency: A slight boost in performance/decrease in CPU load
    • extended boot options, security features: Allows to ship devices accepting only signed firmware thus reducing the risk of breaking a device with an unofficial firmware. This is rather theoretical though.
    • two QSPI-Controllers/ support for PSRAM: Maybe a door open up for adding a fat PSRAM block for really long delay or looper functionalities
    • More Pins: probably removes the need to have and extra Microprocessor for handling extra UI Elements

    To wrap it up: the RP2350 has some exciting new feature, the most important one probably being the floating point support of the processors. I’ll soon start blending the Raspberry Pi Pico and the Daisy Seed codebase of the PiPicoFX into a new Raspberry Pi Pico 2 firmware.